MENU

Party Walls

Posts by Andrea Foss

How to Get Started with LEED for Homes and Multifamily Midrise Certification

Step 1: Understand the LEED for Homes process

The U.S. Green Building Council developed the LEED® (Leadership in Energy and Environmental Design) for Homes™ and Multifamily Midrise™ Rating Systems to assess and validate residential green building practices.

The LEED for Homes and LEED for Homes Midrise certification process is outlined in this video provided by USGBC.

In addition to meeting the rating system requirements, every LEED Homes and Midrise project is inspected and tested during site inspections by credentialed LEED Homes Green Raters. Steven Winter maintains a team of 11 credentialed Green Raters serving 20 states including New York, Connecticut, Virginia, Maryland, Pennsylvania, New Jersey. Massachusetts, and more.

How Does LEED Homes Compare to Other LEED Rating Systems? (more…)

Beyond Earth Day

At SWA we do A LOT to improve the sustainability of the built environment. Sustainability is at the heart of what we do. Culturally, SWA is comprised of a group of people who are committed to upholding a lifestyle that is socially and environmentally responsible both at home and at the office.

In honor of Earth Day 2015 we surveyed the SWA team about their personal consumption habits to generate a baseline understanding from which we hope to improve upon each year. We hope through having a greater understanding of SWA lifestyles, we can continue to inspire and cultivate sustainable behaviors throughout our community.

(Right-click on the image and open in a new tab for easier viewing)

SWA Earth Day 2015


Click here to view in a PDF

What actions do you take to live a more sustainable life? Let us know in the comments or tweet us @_SWinter.

Can A House Be Too Tight?


The Importance of Mechanical Ventilation

During most presentations we give about air sealing and infiltration, like clockwork someone will ask, “but doesn’t the house need to breathe, aren’t we making buildings too tight?” This is a popular green building myth, but  people need to breathe, walls don’t. In fact buildings perform best when they’re air tight and we can temper, filter and regulate the amount of fresh air.

We know the symptoms of poor ventilation – odors, humidity issues, condensation on windows, high levels of chemical off-gassing and even elevated carbon monoxide levels. Some of these effects are immediately apparent to occupants (odors, window condensation) while others may be imperceptible (carbon monoxide). Indoor air quality is a comfort, health and safety concern. However, these problems aren’t necessarily symptoms of tight buildings and can occur in all types of construction, old and new, tight and leaky.

Natural Ventilation Doesn’t Work Anymore

In the past buildings were ventilated with outside air naturally when the wind blew and/or it was cold. If this natural ventilation (or what building professionals call air infiltration) ever worked it doesn’t anymore.

red barn image

“Did you grow up in a barn?” Most of us learned as children the importance of keeping outside air out during heating and cooling seasons. However natural ventilation through building cracks brings unintended moisture and temperature differences that can cause condensation.


Old buildings had no insulation or air sealing, so structural failures caused by condensation within a wall assembly rarely occurred. Building codes now require insulation and air sealing which helps lower our energy bills and keep us comfortable inside. But when infiltration happens in a wall full of insulation, condensation can occur on the cool side of the wall assembly, which over time can rot the framing and cause structural issues. This is why it’s critical to prevent air leaks and better understand the thermal boundary.

Americans spend more time in our homes than ever, almost 15 hours per day by some estimates, and humans give off a lot of moisture. While home we tend to keep the windows closed. We’re also seeing increasing amounts of Volatile Organic Compounds (VOCs) emitted from our paints, furniture and household products that are made with chemical compounds that we know little about. For example, solid-wood furniture does not offgass, but plywood, particle board and foam sure do. How much solid wood furniture do you have in your house? Taken together this means there is more moisture, odors and pollutants added to our homes each day than was the case 30 years ago. The EPA estimates indoor pollutants to be 2 to 5 times higher inside homes than outside.Because of all these indoor pollutants, we clearly need to bring fresh outdoor air into the house.

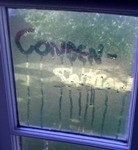
However, the unintentional natural ventilation air our buildings do get rarely comes directly from outside. In the best-case scenario it creeps in through the various cracks in the exterior walls and windows, but most often comes from the least desirable locations shown in the image below: crawlspaces, garages and attics. Leakage from those locations is certainly not “fresh” air. Do you want to breathe in hot dusty attic air, or damp air from your crawlspace? You just might be.

Image of infiltration

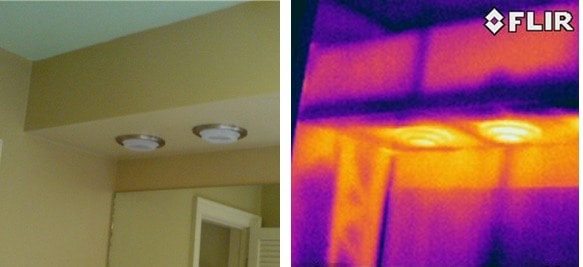
Natural ventilation is forced through infiltration points which are most often from the unhealthiest locations in homes

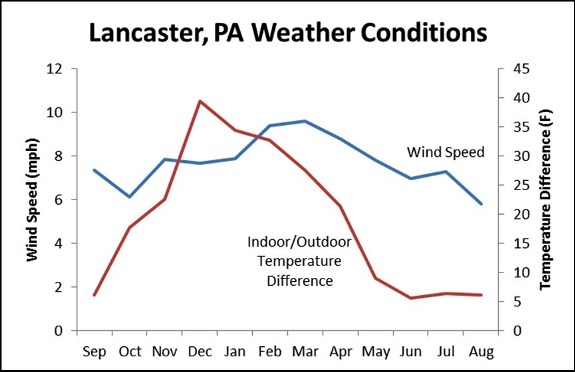
Moreover, unintentional natural ventilation (infiltration) is unreliable and poorly distributed. Infiltration is primarily driven by wind speed and the temperature difference between outdoors and indoors. These weather variables vary day-by-day and season-to-season. For instance, the chart below shows the average conditions for Lancaster, PA. Note the weather fluctuations throughout the year:

  • During summer wind speeds are almost 50% lower
  • The temperature difference is 6-8 times greater during winter

lancaster-weather-conditions chart

These erratic conditions cause the building to be over-ventilated half the time and under-ventilated the other half. Also, infiltration is poorly distributed throughout the house. A room with a couple exterior walls and leaky windows will get far more outside air than an interior kitchen or bathroom. Wind and temperature differences drive ‘natural ventilation’ in the form of infiltration in homes. However these factors are highly variable and unreliable.

To summarize the need for mechanical ventilation:

  • There are more pollutants in our homes than ever, requiring more ventilation air
  • Homes are better insulated and air sealed than they used to be
  • Much of the infiltration that does occur comes from undesirable locations
  • Even the portion of infiltration that can be considered “fresh air” varies sporadically based on weather conditions
  • Having air leaks in an insulated wall, attic or floor assembly can cause condensation and create structural failures.

For all these reasons, relying on air leaks as natural ventilation no longer works. It doesn’t work for normal homes, and it especially doesn’t work for insulated or tight homes.

Build It Tight, Ventilate It Right

The better approach is to provide controlled mechanical ventilation by providing enough air to meet ASHRAE 62.2 and air seal the house to prevent moisture issues, high energy bills, and air from the attic and crawlspace or basement from polluting our indoor air.  As the mantra goes, “build it tight, ventilate it right!”

A well-designed ventilation system brings several advantages.

  • It allows control over exactly how much fresh air is delivered and when.
  • You can adjust the amount of ventilation air if the occupancy changes (e.g. kids go off to college) or shut it down altogether while on vacation, or when windows are open.
  • It delivers a consistent amount of air year-round, no matter what the weather conditions.
  • It draws air directly from outside, so the air is guaranteed to be fresh.

The main disadvantage to mechanical ventilation is the cost to run the fan. There are many different types of systems, with widely varying costs. As the following case studies shows, this additional cost can be more than offset by the savings in reducing the uncontrolled infiltration.

Mechanical Ventilation Case Study

Consider the following single family detached home renovation project in Lancaster, Pennsylvania. Before renovation, the house had no mechanical ventilation, and much of the infiltration air came from the attic and basement, providing dirty air to the house. The house was leaky enough to meet ASHRAE 62.2 levels for natural ventilation. But with an infiltration rate of 1.1 air changes per hour, the house was replacing all its indoor air every hour, leading to huge heating bills.

During the renovation air sealing brought the infiltration down by 70% and mechanical ventilation was added to deliver the recommended ventilation rate, which in this case was 0.20 ACHn.

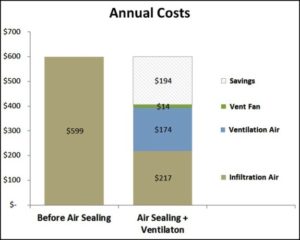
Looking at the annual utility bills, in the original house it cost almost $600 per year to heat the infiltration air. After air sealing this was cut to $217. Heating the ventilation air cost $174, and running the fan cost an additional $14 per year. Not only is the house now less drafty and more comfortable, the indoor air quality is substantially better AND the homeowner is saving $194 per year.

Not every case follows this same savings ratio. If the original house was  tighter to begin with there may not have been any theoretical savings. If the mechanical ventilation system were more efficient, there could be more savings.

But remember that mechanical ventilation puts the control in the hands of the occupant, not mother nature. If there seems to be too much ventilation, the occupant can dial it back. If there are indoor air concerns the occupant can increase the rate.

Designing an Effective Mechanical Ventilation System

There are several strategies for designing a good mechanical ventilation system, and there isn’t a one-size fits all approach for homes, multifamily buildings and commercial spaces. It’s important to keep occupants in mind and install the proper controls to make the system work for them. Everyday Green has helped MEPs and HVAC contractors select and size mechanical ventilation systems for all budgets and size buildings, homes and unit spaces. But one thing is clear: relying on air leaks to provide fresh air is no longer an effective strategy. Contact us today with your mechanical ventilation questions.

Andrea Foss


By Andrea Foss, Director,  Mid-Atlantic Sustainability Services

Getting it Right – HVAC System Sizing in Multifamily Buildings

Properly Sizing Mechanical Systems in Multifamily Buildings

Multifamily buildings can be a unique challenge when it comes to selecting effective heating and cooling systems. In the Washington, DC region’s mixed-humid climate, humidity control becomes a central challenge because of a couple inescapable realities.

  1. There is a lot of moisture added per square foot from cooking, bathing and even just breathing due to the dense occupancy.
  2. The small exterior envelope areas mean the air conditioner won’t kick on very often, and thus won’t have a chance to remove moisture.

High humidity can lead to complaints over comfort, condensation on registers and exposed duct work, and even mold. To effectively remove moisture, the air conditioner should run for long stretches. This means properly sizing mechanical system. Unfortunately many project teams exacerbate the problem by selecting grossly oversized cooling equipment that runs even less frequently.

Steps to Right-Sizing Mechanical Equipment

  1. Perform accurate calculations using the Manual J process to estimate peak heating and cooling loads
  2. Consult the manufacturer’s performance data at design conditions, and
  3. Select the smallest piece of equipment that will meet the load.

Common Problems When Sizing Mechanical Systems

 “Can’t I just use the worst-case orientation?”

Large windows in a corner unit can change the equipment sizing needs compared to interior units

Large windows in a corner unit can change the equipment sizing needs compared to interior units

No. In most cases the largest envelope load in apartment units is the windows. A unit with floor-to-ceiling windows facing west will have very different loads than the same unit facing north, so be sure that the load calculation reflects the actual orientation. If the same unit type occurs in more than one orientation calculate the loads for each orientation and make selections accordingly. This may require different selections and duct layouts for different orientations.

“Can I use commercial software?”

Yes, but you have to be careful. Commercial load software like Train TRACE and Carrier’s HAP are primarily geared towards non-residential space types that have very different use profiles. For instance, in an office setting you would expect lighting and equipment to be 100% on during the peak afternoon cooling hours. However, in a residential setting few if any lights are on during the day.

The commercial programs also like to include more outdoor air than you actually see in apartments. A reasonably well-sealed apartment will have very little natural outdoor air infiltration (remember only 1 or 2 sides of the apartment “box” are actually exposed to outside) and mechanical ventilation should only be about 20-35 CFM depending on the size of the unit. It is not uncommon for loads to drop by half once those inputs are corrected.

 “Will small systems have enough power to get the air to all the rooms?”

Smaller systems don't mean less power

Smaller systems don’t mean less power

Absolutely. First of all, the smallest split systems available are 1.5 tons, which is really not that small. Second of all, 1.5 tons air handlers are rated to 0.5 IWC external static pressure just like 2 and 2.5-ton systems. If that sounds like gibberish it means 1.5 ton systems have the exact same “power” to push air through long runs as larger systems.

The blower motor is smaller only because it’s pushing less air, just like a motorcycle has a smaller engine than a car but can still accelerate as quickly. We have seen 1.5 ton systems used in 1500+square feet  2-story homes. If you can’t get air to a 900 square foot apartment you have a duct sizing issue, which would be a problem no matter what size the air handler.

 “Doesn’t each room need 100 CFM of airflow for comfort?”

Well, maybe. Is 100 CFM what the load calculations show is needed? There is no such thing as a minimum airflow threshold for each room. The amount of air required is in direct proportion to that room’s heating and cooling load. If the calculations show a small load and only 40 CFM required you should supply 40 CFM. In fact, oversupplying 100 CFM will actually cause discomfort since that room will always be a few degrees off from the rest of the apartment. Sitting under an oversupplied register could be loud and drafty as well.

“But can’t I just size by bedroom count?”

No, rules of thumb don’t cut it anymore. For buildings built to 2009 or 2012 code in our climate zone (CZ4), most apartment units will have loads less than 1.5 tons, no matter how many bedrooms. There may be a few 2-ton or (rarely) 2.5-ton systems for larger apartments on the corner or top floor, but those are the exception.

If your mechanical plans show 1.5 tons for all 1 bedrooms and 2 tons for all 2 bedrooms it probably means

  1. Accurate sizing procedures were not followed, and
  2. A lot of those 2 bedrooms actually only need 1.5 ton systems

The only way to know for sure is to perform the calculations.

Conclusion

Most of these issues are the result of a very natural instinct to be conservative in the face of uncertainty. The truth is there are a lot of variables that will change the real-world heating and cooling load in a unit: how many people are in the apartment, when they are cooking, are they using blinds. The problem is in this case “conservative” means designing for temperature control at the expense of humidity control. Every extra ½ ton capacity means less dehumidification – that’s a fact. The only way to control both temperature and humidity is to perform accurate calculations, resist the urge to add extra safety factors, and size the equipment strictly according to the calculated loads.

As an added benefit, smaller equipment requires smaller electric service capacities. Especially in a rehab situation with existing service, choosing right-sized equipment is more likely to allow the use of existing service instead of requiring expensive service upgrades.

All About Infiltration Part 2: Blower Door Testing

Blower Door Testing to Measure Air Leaks

Every home has air leaks, but the cumulative amount of leaks can vary widely based on the air sealing efforts. Infiltration and air sealing basics are covered in part 1 of this post.

To measure the amount of leakage in a home we use a tool called a blower door, which is comprised of a calibrated fan, a mounting system to attach the fan to an exterior door, and a manometer which measures pressure.

To understand the principle behind the blower door test imagine a large parade balloon like Kermit here. If the balloon is completely air tight we can pressurize it, shut off the valve, and the balloon will remain inflated indefinitely.

Now imagine the balloon has some small leaks at the seams. To keep it inflated we need to continuously blow in air to replace the air leaking through the seams. The larger the leaks are, the more air is required. Thus, if we can measure the amount of air we are blowing into the balloon to keep it fully inflated, we can infer how leaky the balloon is.

That’s exactly what a blower door test does: it measures the amount of air needed to keep a house at an elevated pressure of 50 Pascal (i.e. “inflated”), and we use that measurement to infer how many leaks are present.

Blower Door Test Metrics

The blower door results can be expressed in a few different metrics. The most common one is air changes per hour (ACH), or how many times a house’s air completely replaced in a given hour. Since we take our blower door measurement at 50 Pascal most codes and standards reference the air changes at that elevated pressure (ACH50), but we can also calculate the air changes under natural conditions (ACHn).

For example, a code-built new home with decent air sealing might have 7 air changes per hour at 50 Pascal (ACH50), meaning if we kept the blower door running for an hour it would pump in enough air to completely replace the home’s air 7 times. This would translate to about 0.35 natural air changes per hour (ACHn), or about one complete air replacement every 3 hours.

What’s A Good Blower Door Test Number?

The metrics and math can get a little technical so let’s put them in context. Here’s a rough scale to compare your blower door test number to other standards:

10-20 ACH50 – Older homes, like living in a “barn”

7-10 ACH50 – Average new home with some air sealing but no verification and little attention to detail

7 ACH50 – OK infiltration level and the 2009 IECC energy code requirement

3-5 ACH50 – Good and achievable target for most new homes. The ENERGY STAR reference home is 5 ACH50 for climate zone 4 which covers DC, MD, VA and part of PA. The majority of PA is 4 ACH50 for the ENERGY STAR reference home.

3 ACH50 and lower – Tight home with great air sealing, and required by the 2012 energy code adopted in MD and coming to other jurisdictions soon.

.6 ACH50 – Super tight home and the Passive House standard.

Using a Blower Door Test to Reveal Defects

In addition to quantifying air sealing effectiveness, a blower door test can also help find defects, especially in conjunction with an infrared camera. The blower door will exacerbate the natural infiltration occurring in a house making air leaks easier to find because the air outside forcing its way in shows up as a different color on the IR camera. For example the image below shows a bathroom soffit built below an attic without a proper air barrier.

The photos below were taken in the summer during an existing home energy audit. The infrared photo on the right shows warmer colors in yellow and is the hot summer air coming in through the can lights and walls next to the soffit.

The problem is the air barrier doesn’t align leaving pathway for air to infiltrate. Everyday Green reviews plans for inclusion of proper air barriers and then we inspect them onsite before drywall is installed to prevent bypasses like the ones in the IR image above.

Stop Those Air Leaks – All About Infiltration

What is Infiltration?

Infiltration is the uncontrolled or accidental introduction of air, often called air leakage.

A lot of people assume air leaks happen predominately around windows and doors. In actuality air is driven through our homes and buildings by the stack effect – warm air rising. This means the attic or the roof, and the basement, are most critical for preventing air leaks and infiltration. Infiltration is a bad thing: not only is it a huge energy waste, it brings in air from the dirtiest places like attics and crawlspaces, and spreads that contaminated air through the living space.

The key to stopping infiltration is creating a good air barrier.

Think of a building’s insulation like a wool sweater. On a calm fall day the sweater is enough to keep you warm. If a breeze picks up, though, the cold wind will blow right through the wool and you will probably reach for your windbreaker. In a home we call the windbreaker layer the air barrier, and it is just as important as the insulation. Insulation limits heat transfer through the walls and roof, but only when paired with an effective air barrier.

Stop Infiltration – Air Barrier Rules

  1. air sealing detailsThe air barrier needs to be totally continuous. If you take a cross-section plan of the building, you should be able to draw the air barrier all the way around without lifting your pen.
  2. The air barriers, such as drywall, should be in direct contact with the insulation. This often breaks down in locations like walls under staircases, behind fireplaces, and under tubs where there is (hopefully) insulation but no drywall air barrier.

Where Does Most Infiltration Occur?

There are three critical types of air leaks to watch out for:

  1. Big holes.  Some common design elements can result in big holes in the air barrier. For instance, a dropped soffit is a great pathway for air leakage. Tubs and fireplaces on exterior walls can create similar holes if a solid piece of rigid insulation isn’t installed behind them. Floor joists that extend from conditioned space to a garage or balcony are another way to blow open the air barrier. While these locations can be air-sealed and insulated, good design would eliminate the potential for big holes altogether.
  2. Cracks.  Every building has a number of cracks that seem minor when taken on their own, but add up to a big air leak. These cracks occur between the sill plate and foundation, at exterior wall bottom plates, between adjacent studs, and around window and door frames.
  3. infiltration at can lightPenetrations.  Every hole cut in the exterior envelope (ceiling drywall, exterior sheathing, top plates below attic) creates a potential air leak. Penetrations include plumbing pipes, duct registers, can lights, exhaust fans and exhaust ducts, and electrical wiring.

Air is relentless: it will find any and every pathway into a building. Sealing 50% of the apparent leaks will not cut 50% of the infiltration because air will find another way in. Good air sealing aims to seal 90% of the leaks. It requires patience, attention to detail and the expertise to recognize tricky air bypasses. It also requires a clear understanding of the thermal envelope, especially at complicated architectural details.

Tips for Successful Air Sealing:

  • Good air sealing requires a plan, and should be a priority during the design phase. Ask yourself where is the air barrier? Can you draw it without lifting your pen? Check out our tips for multifamily compartmentalization.
  • During construction, air sealing should be the responsibility of all the trades. Air is persistent, and the whole project team needs to be just as thorough in fighting it.
  • A good rule for a job site is if you cut a hole, you seal it. It is easier for each trade to seal their own holes, rather than relying on one person to find everyone else’s holes.
  • Fire-stopping is not necessarily air sealing. Fire-stopping material like rock wool does virtually nothing to stop air infiltration. Use caulk or foam to air seal.

In our follow-up post we cover how air leakage is measured with a blower door test and what a good target is.

The owner of this website has made a commitment to accessibility and inclusion, please report any problems that you encounter using the contact form on this website. This site uses the WP ADA Compliance Check plugin to enhance accessibility.